SCUTUM PRESS 1/24/03
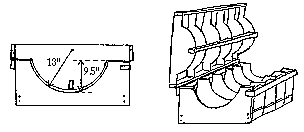
| A press can be made of 3 or more pieces cut from 2" lumber as shown, laid in row to the approximate length of the shield. They can be joined together with scrap lumber, or fixed to a plywood base, etc. Glue the 2 layers of the shield together with hide or wood glue and immediately place one edge in the notches of the press. Then use drywall screws and an electric screwdriver to begin screwing the wood down, working from the notches and placing the screws a few inches apart. (Simply bending the free end down may crack the wood.) Allow the glue to dry overnight (some may ooze out) , then remove the screws, and trim the edges of the wood if necessary. |  |
"IMPROVED" PRESS:

The simple press described above
is adequate for making six or seven shields, but after that the screws
begin to tear up the ribs. There can also be problems with wavy edges
and with all the screw holes in the finished blank. This improved
scutum press takes a couple days to construct, but eliminates those problems
and is vastly easier to operate.
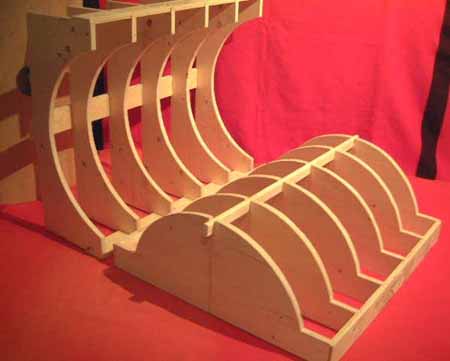
The press is composed of about
six sets of "ribs", each with an upper "male" half and a lower "female"
half. They are carefully aligned in a row and secured with longitudinal
braces or stringers. The upper and lower parts are hinged together
along one side and latched shut at the other.
The radius of the curve of the
lower half is 13 inches (33cm.). Remember to make the radius of the
upper half less than that, by the thickness of your wood; i.e., we use
two layers of 1/8" wood to make a 1/4" blank, so the radius of the top
curve is 12-3/4". Also, the curve is not a complete semi-circle--a
depth of about 9-1/2" is sufficient for a shield width of up to 33".
Draw and cut all the ribs very carefully. The total width and length
of each rib is not important, as long as they are ALL THE SAME.
Secure the lower ribs in a row
c. 36" (90 cm.) long, by whatever means is available--long "stringers"
secured with matching notches; sheets of plywood; blocks fastened between
ribs; etc. Be careful to align the ribs precisely, using a straightedge.
Do the same with the upper ribs, being sure the halves fit together neatly.
Hinge the halves together along
one edge, and at the other side put a couple latches, hook and eye screws,
or other catches. (I used cords and screw eyes, but if your press
is designed for thicker shields your catches may need to be sturdier.)
Check the operation of the hinges.
Now put wood for a scutum blank into the press WITHOUT ANY GLUE, close it, and crawl around looking for gaps between wood and ribs. The layers of shield wood must be clamped together without gaps. "Low spots" on the ribs can be shimmed, and there may be "high spots" that need to be trimmed. (See why careful cutting and alignment are necessary?) After trying and re-adjusting the shims several times, however, and still getting gaps between my shield layers, I removed them all and tried another method: I put the glued layers of wood in the press as usual, then hammered little wood wedges under the ribs in the areas where I'd been getting gaps, particularly down the center. It worked much better!
Once the trimming and shimming
are done, you're ready for business: spread glue on one layer of shield
wood, slap the other layer on it, stick them in the press, close and latch
it. (Soaking the wood beforehand is NOT necessary, and may keep the
glue from working.) Insert the wedges if necessary. (Beware,
some glue may ooze out onto the floor!) Leave it for a day or two
to allow the glue to dry thoroughly and it's done--repeat for the next
one!
 |
At left is David Blain's lovely press. No hinges, the two halves are simply clamped or weighted. He reports good success. |
----------
*Home*Handbook Intro*Tunic*Caligae*Cloak*Belt*Helmets*Segmentata*Hamata*Squamata*Subarmalis*Scutum*Gladius*
*Pilum*Pugio*Packs*Mess
Gear*Tools*Crests*Drill*Leatherworking*Armoring*
----------
*Home*Schedule*Handbook
*Auxiliaries *Civilian
Clothing *Cold-Weather Clothing *Signum*LINKS*SUPPLIERS*Bibliography
*
*ADLOCVTIO*Tent
and Camp *Roman Days*History*Names
*Advice
on Starting a Group *PHOTOGRAPHS*Bylaws
*Membership*